SNOW RESPONSE: Deliveries for the following areas are RESCHEDULED FOR SATURDAY 1/31:
Vint Hill, Manassas, Woodbridge, Fredericksburg, Charlottesville, and Culpeper

Order deadline is now Wednesday @ midnight

Easy One-Pan Turkey Drumstick Recipe

written by

Bethany Fisher

posted on

April 2, 2025

WT-blog-1.png

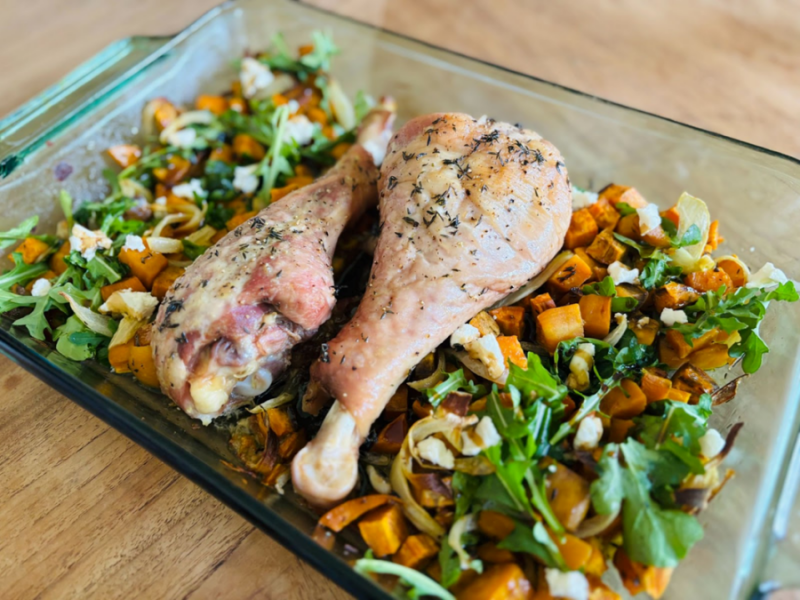
Everyone has those hectic days when no one has time to spend hours in the kitchen, so we all need quick and easy meals in our back pocket. This one-pan meal (inspired by a combo Liz Straight likes to make for their family) combines the sweet and savory flavors from thyme, sweet potatoes, balsamic, garlic, onion, and goat cheese. It serves about 3-4 people, takes about 20 minutes to prep, dirties only a few dishes, and is packed full of flavor, so it’s a winner!

A bonus to turkey is that it is actually cheaper per pound than chicken is, and can be substituted for chicken in just about any recipe! And it is packed with a wide range of minerals and B vitamins.

This recipe uses turkey drumsticks, which is the most economical cut of turkey we carry (and dare I say the tastiest?). But you can substitute whatever cut of turkey is your favorite and adjust the cooking time accordingly!

Easy One-Pan Turkey Drumstick Recipe:


Ingredients:

2 turkey drumsticks (I used 2 - 2.5 lbs drumsticks)

3 Tbsp. butter, tallow, or lard

4 sweet potatoes

1 small onion

2 cloves garlic, minced

1 Tbsp. fresh thyme leaves

½ tsp. Garlic powder

Salt and pepper to taste

1 cup fresh arugula

Crumbled goat cheese (optional)

Balsamic vinegar or glaze

Chopped pecans (optional)

Directions:

1. Preheat your oven to 300.

2. Peel and dice the sweet potatoes, then slice the onion. Combine both in a 9x13 pan. Add in the minced garlic, thyme leaves, and sprinkle salt and pepper on top. Melt the butter, tallow, or lard in a small saucepan. Add a couple tablespoons to the sweet potato mixture (make sure to reserve some for your turkey drumsticks). Mix everything together.

3. Pat your drumsticks dry. Rub the rest of your melted fat of choice onto the drumsticks, then sprinkle on the garlic powder and some salt and pepper. Nestle the drumsticks in the pan with the sweet potatoes.

4. Place in your preheated oven and cook for about 80-90 minutes, or until the internal temperature of the meat reaches 165 F.

5. Take the pan out of the oven and let it cool a bit. Then add in your fresh arugula, crumbled goat cheese, and pecans. Mix it up, and drizzle the balsamic over the top.

6. And you’re done!

I made this at work on a day when I didn’t have any leftovers in my fridge to bring for lunch. It was super quick and easy to whip up, but still a very satisfying, delicious meal. 

Another variation you can do with this is to substitute butternut squash instead of the sweet potatoes. Your choice!

Enjoy!

~Bethany

More from the blog

Easy Skillet Filet Mignon

When I heard the words ‘filet mignon,’ I admit I was a bit daunted. After all, filet mignon is renowned as a delicacy and all I had was a cast iron skillet. In all honesty though, cooking a filet mignon was not as difficult as I thought it would be. In about ten minutes I had a perfectly cooked steak for dinner. For all you mamas out there who want to serve up a very special dinner for your loved ones, here is a quick, easy, and tasty way to do that! Easy Skillet Filet Mignon: (2) 6 to 8 oz filets (let them sit out at room temp for about 30 minutes - this will help make sure the steaks cook evenly) 2 Tbsp. butter or tallow (butter can burn a little more easily but still works great!) 1 clove garlic, minced or sliced 1 sprig rosemary, leaves torn off and chopped up Salt and pepper to taste Directions: Heat up your cast iron skillet over medium heat. The pan is ready when you sprinkle a drop of water and it dances across the surface.Salt and pepper your filets to taste.Add your butter or tallow to the pan and let it melt. Then add the garlic and rosemary and let it cook a couple minutes til fragrant.Place the filet steaks into the cast iron. Make sure there is plenty of space around the steaks so there is proper air flow for a nice sear. Cook on each side for a few minutes or until nicely seared. Then place a lid over the pan to trap in heat, turn the heat to low, and let cook until the internal temp of the steaks reaches your desired doneness. I like to do mine to 130F, or medium rare. And there you have it! Quick, simple, and easy. Pair with some asparagus, green beans, brussel sprouts, mashed potatoes, or salad. Cheers! ~Bethany

2025 Recap and What’s Coming in 2026!

I have so much to be thankful for in 2025.  Here are some highlights: --Working with a WONDERFUL team.  So kind, so diligent, so funny, so cheerful.   --Raising food that is truly healthy for the land, the animals, and eaters!  Work I am so proud of! --Being supported by hundreds of families like you that chose to feed your family food that is truly healthy because we give the animals a life and diet that fit their natures.  --Working with 5 local landowners who graciously rent us their farmland.  Without them, we couldn't do what we do. --Carmen Ashwell (Meatbird and Processing Manager) getting married to Brendan McGurk (friend and former employee)! --Getting 45 inches of rain year-to-date.   --Several really fun farm tours and our recent Holiday Market --Renovating the Farm Store --Putting in a new refrigerated room that helps us be more efficient with our egg handling.   --Painting all the barns and some of the fences.   --Our new winter watering system for the hens.  (This is very nerdy, inside baseball, but if you are interested, let me know.) I am sure I am forgetting so many things.  There are so many things to be thankful for.  Thank you all for your part in supporting our work and making this all possible!  God bless you, and I look forward to our good work together in 2026! And check out the video HERE for an exciting update about our Neighborhood Deliveries coming in 2026! Jesse Straight

Egg Nog Recipe (You'll Never Go Back to Store-Bought Again!)

December is definitely my favorite time of year. I love the holiday season. A huge part of that isn’t just Christmas itself, but everything that happens leading up to Christmas. It’s all the little things…frosty mornings, the first snowfall (I grew up in Minnesota, so snow came early!), the perfect Christmas tree, drinking hot chocolate by the fireplace, lights twinkling in the windows… and of course, eggnog. If there’s one drink I love most in the world (except coffee, which deserves its own category!), it’s eggnog. Rich, creamy, smooth...with hints of nutmeg, cinnamon, and vanilla… it automatically makes me think of Christmas. Quite often in December, you can find me curled up on the couch in front of the fireplace, reading a book and enjoying a glass of eggnog. This week, I wanted to share with you my favorite recipe for homemade eggnog. It takes some time to make, but the results are SO worth it! Store-bought eggnog can’t compare to homemade. Whether you want to treat yourself to help get you in the Christmas spirit, or whether you want to have a special treat for your loved ones on Christmas Day, I guarantee you’ll love this recipe! This recipe is a cooked version. While raw eggnog is still mouthwatering, I personally like it cooked better. I think it gets a richer, creamier consistency that is absolutely amazing! One tip for making this recipe is - patience! You can’t rush perfection! Cook your eggnog at a low temp to avoid cooking the eggs too fast. That way it doesn’t get clumps of scrambled eggs or start to taste too “egg-y.” And I promise, the patience pays off! Ready to make your own? Grab the ingredients and follow the recipe below, and bring your eggnog game to a whole new level! Perfect Homemade Egg Nog Recipe What you’ll need: 6 large Whiffletree egg yolks⅓ cup sucanat, coconut sugar, or maple sugar1 cup heavy cream2 cups whole milk1 cinnamon stick1 vanilla bean, or ¼ tsp vanilla extractPinch of salt¼ tsp ground nutmeg (fresh ground nutmeg is the way to go! I just use a lemon zester to grate what I need from a whole nutmeg…otherwise already ground nutmeg works just fine!)Optional: ¼ cup bourbon, whisky or rum Here's how to make it: First, whisk the egg yolks with the sweetener of your choice until it turns a light color and is creamy. Next, add the milk to a medium saucepan and warm over medium-low heat. Once you begin to see steam rising from the milk, measure out one cup of the heated milk. Slowly pour the milk into your egg mixture, whisking the entire time to make sure the milk doesn’t cook your eggs. This helps to temper your eggs, or warm them up so the shock of adding them to the hot milk doesn’t fry them. Next, take the tempered eggs and slowly pour them into your saucepan with the heated milk, again stirring the entire time. Add in the cinnamon stick and vanilla bean, if using. Keep the heat on medium-low. (Don’t get impatient and turn the heat up too high  - you’ll cook your eggs too fast and end up with a clumpy mess!) Using a wooden spatula, slowly stir the mixture as it cooks, making sure to scrape the bottom of the pan to keep bits of eggs from sticking to the bottom. After about ten minutes, you should see the mixture begin to thicken. Test the temperature with a thermometer - you want it to get to 160 F before taking it off the heat. (The mixture will further thicken as it cools in the fridge.) Another way to test the thickness is by dipping your wooden spatula into the mixture and taking it back out - if the egg mixture coats the spatula and doesn’t just run off, it’s ready. But if you’re not experienced making eggnog, use your thermometer to make sure! Once it reaches 160 F, pour the egg mixture through a strainer into a bowl or jar. This will make sure you don’t end up with unpalatable clumps of eggs in your drink. If you used the vanilla bean, cut it in half down the length of it, and use a butter knife to scrape all the vanilla bean seeds from inside the pod. Add that into your egg mixture and whisk to incorporate. If you didn’t use the vanilla bean, add in your vanilla extract. Next, add in the nutmeg. Then cover the mixture and set into the fridge to cool it down. While the egg mixture is cooling, pour ½ cup of the heavy cream into a bowl. Using a hand mixer, beat the cream until it thickens and forms soft peaks. Once the egg mixture is cold, add in the whipped cream with the other ½ cup of heavy cream and whisk it together to incorporate. Don’t whisk too fast as you don’t want to break the cream down too much…whisk slowly and just enough to mix the two together. If you want to make it alcoholic, add in a quarter cup rum, whisky or bourbon. And there you have it! The best, most delicious eggnog. It’s so creamy and smooth…you’ll never want to go back to store-bought again! Stop on by the farm store, pick up your eggs, and give this recipe a try! Make sure to let us know what you think! Have you ever had homemade eggnog before? Comment below and tell us how you like to make it! Cheers! ~Bethany