Free delivery for orders over $125!

Budget Series: 3 Ways to Use a Whole Chicken (Part 1)

written by

Bethany Fisher

posted on

June 7, 2025

Whole-Chicken-1(1).png

Cook a whole chicken? Sure, it’s more budget friendly, but… how and what do you do with it?

This month, we’ll be kickstarting a budgeting series with a few different ways to use a whole chicken. Trust me, it’s actually super easy, and I think it saves more time! Per pound, the price of a whole chicken is much more budget-friendly than getting parts. For example, thighs are going for $14.00 per pound, but a whole chicken is $6.50 per pound!

There will be four parts to this blog series. This week, we’ll learn how easy it is to roast a pasture-raised chicken that isn’t dry and tasteless. Get ready to save on time and money!

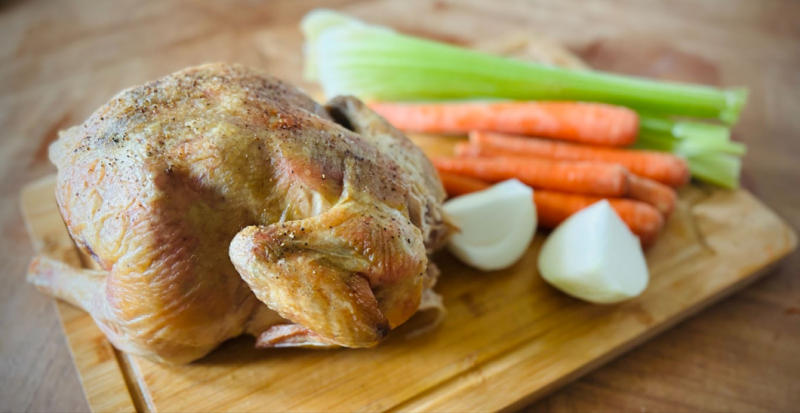
Easy Roasted Whole Chicken

Ingredients:

1 whole chicken (I used a 5.5 lb chicken)

2 Tbsp butter, melted

Salt and pepper to taste

4 garlic cloves, whole

Instructions:

1. Preheat your oven to 350 F.

2. Place a roasting rack in a 9x13 pan (optional, but helps the chicken get a crispier skin). Pat your chicken dry with a paper towel and place breast side down on the rack. Using a pastry brush, spread the melted butter all over the chicken, then sprinkle with salt and pepper (you can also get creative and do a few different seasonings or herbs, like thyme, paprika, etc.). Next, place your garlic cloves inside the cavity of the chicken.

3. Set the pan on the middle rack of your oven. Roast the chicken for about 1.5 hours (about 16 minutes per lb), or until the thermometer reads 160 in the breast and 165 in the thigh. Make sure to stick the thermometer in the meatiest part of the breast or thigh! As always, go by the temperature rather than the time - the time can vary, so you really want to be paying attention to the temp so you don’t overcook.

*If you have a smaller chicken, the time will be less for it to fully cook, so adjust the time by multiplying the total weight of the chicken by 16 minutes, and that will give you an estimate of how long it will take. 

4. The opportunities are endless! You can either serve it as a roast chicken for dinner along with some mashed potatoes and roast veggies, or you can shred it to use in any chicken dish you want!

I cooked up a 5.5lb chicken for one of our team lunches and shredded it all to use in a version of chicken pot pie (homemade biscuits topped with a chicken pot pie filling - I know, not really a pot pie but it tastes the same!). It fed 14 people hungry from a day of hard work on the farm. So it can stretch a long ways! And I saved the bones and skin so I can make a broth out of that. Nothing goes to waste!

If I don’t have people to feed and it’s just me, then I find this saves time and money because I can cook a big chicken all at once, shred it, and then portion it out and freeze what I won’t use right away. That way during the week I can just grab out a bag of already cooked and shredded chicken to make a quick meal out of.

And there you have it! One easy way of cooking a whole chicken and prepping for more than one meal at a time.

Next week, we’ll show you how to make a crockpot version of a whole chicken. Stay tuned!

Cheers to you and your health…and your wallet!

~Bethany

More from the blog

3 Delicious Recipes for Thanksgiving Leftovers

It’s the day after Thanksgiving. Your fridge is probably stuffed full of Thanksgiving leftovers. Lucky you! But maybe you’re looking at all that extra turkey, and you’re wondering how to eat it all up. If that’s you, then keep reading to find out delicious ways to use up those leftovers! I love having lots of Thanksgiving leftovers. But if you’re like our family, we have TONS of leftovers we are eating up for days after the holiday. And people can get tired of nothing but roasted turkey for dinner. So I like to get creative and find fun, delicious ways the whole family will enjoy to use up that extra turkey. Today, we have these fun recipes to share with you! Turkey Brie SandwichesTurkey Chorizo SoupBiscuits and Turkey Gravy These recipes are a few of my favorites. A sandwich bursting with sweet and savory flavors…a hearty, cozy soup for the end of a chilly day…or a comfort food with a twist that reminds me of grandma’s kitchen. Click on the link below and give these a try, and let us know which one is your favorite! 3 Delicious Recipes for Leftover Thanksgiving Turkey! And if you want to try all of them but don’t have enough turkey leftover (or maybe no turkey at all), not to worry! We still have turkey available. Grab some turkey HERE and give these recipes a try! After all, who said turkey is just for Thanksgiving? Do you have a favorite recipe you like to use up your leftover turkey? Comment below and inspire the rest of us! Your farmer, ~Jesse

What to do with those turkey giblets…

If you’re like me, you didn’t grow up eating animal organs like heart or liver. Maybe you’re a little grossed out by the idea. I completely understand the feeling! But I’m here to tell you they’re not as gross as they’ve been made out to be! What are Giblets? First off, what are turkey giblets? They are the heart, liver, and gizzard. If you purchased a Whiffletree whole turkey, you found all three of those in the cavity of the turkey. Health Benefits Poultry organs (and all animal organs) have amazing health benefits. They’re very high in protein, which is essential for our bodies to get enough of for everyday functions. You’ll also get the benefits of vitamins A and B, iron, and CoQ10. In a nutshell, giblets are a health powerhouse! Flavor What about the flavor, you may ask? I personally don’t love the flavor of organs alone, but once you add in garlic and butter, they taste amazing! So, here’s how to make a delicious, nutrient-dense giblet gravy. Nutrient-Dense Giblet Gravy Recipe What you’ll need: Turkey neck3.5 cups waterTurkey giblets  2 garlic cloves, minced⅓ c. flourDrippings from roasted turkey6 Tbsp butterSalt to taste If you’re looking at the giblet gravy recipe from one of our previous blog posts, you’ll notice the way I do it here is a little bit different. Both are great ways of making it, so it’s up to you which way you prefer! You’ll also notice the recipe says to sear the neck along with the giblets. If you already have chicken or turkey bone broth made and on hand, definitely go ahead and do that! I didn’t have any already handy, so here’s what I did. I reserved the turkey neck from my whole turkey and put it in a medium saucepan with 3.5 cups of water and a teaspoon of apple cider vinegar. I brought it to a boil over medium high heat before turning to low, letting it simmer for about an hour. (Or you can put all this in a small crock pot and cook it overnight before making the gravy, but maybe add a little more water so too much doesn’t simmer away. You want to end up with 3 cups of broth). Once the turkey broth was complete, I melted 2 Tbsp butter in another saucepan over medium heat, and then I added the turkey giblets, searing for a few minutes on each side before adding in the turkey broth. I brought the broth to a boil before turning the heat down to low and letting it simmer for about 30-40 minutes. After simmering, I drained the broth into a bowl and took out the giblets and finely diced them, removing any gristle. Next, I melted 4 Tbsp of butter over medium low heat, then tossed in the minced garlic and cooked until fragrant. Then I added in the ⅓ cup of flour and whisked to make a roux. I let that cook until browned for a couple minutes, constantly stirring, then slowly poured in the broth and reserved roasted turkey drippings, whisking the entire time to keep any clumps from forming. I reduced the heat to low and stirred for a few minutes while it thickened to my desired consistency. I took it immediately off the heat, added in salt to taste, and stirred in the diced giblets. And there you have it! A delicious giblet gravy. Trust me, no one will complain about the fact that there are chopped up giblets in there! It tastes amazing and adds so much flavor to the roasted turkey. And you can feel good that you’re getting a bunch of amazing nutrition into your loved ones! If you missed the original recipe from one of our previous blog posts, click HERE to see it. Click HERE to browse turkeys for Farm Store pick up! Click HERE to browse turkeys for Neighborhood Delivery! Click HERE to browse our store! How do you like to make your gravy? Do you love giblets, or are you new to it? We want to hear from you! Comment below and tell us what you do! Cheers to you and your health! ~Bethany

To Brine, or Not to Brine?

That is a common question we get here at Whiffletree Farm. And especially since it’s a pasture-raised turkey, people wonder what the best way to prepare it is. The answer is… BOTH are good methods! Our turkeys are moist and flavorful as they are, so many people skip the brining and go straight to roasting. And they say it still tastes great and has amazing moisture - even the white meat! (But it is critical to use a meat thermometer and monitor it closely so that you don’t overcook– 165 F is the highest you need to go.) Personally, I do like brining. I like that extra bit of flavor and moisture it gives to the turkey, and I love that you can get creative with it! Want more of an herbal flavor? Add rosemary, thyme, sage, bay leaves…you name it. Want a fruity flavor? Add apple cider or orange slices with some cloves to the brine. Yum! In the video included in this blog post, I did an herbal brine. Watch the video above, or keep reading to find out how to brine your turkey! Want to try this out for yourself? Learn how to get one of our pasture-raised turkeys HERE and let us know what you think! What you’ll need: 2 gallons water1 1/2 cups kosher salt3 Tbsp. peppercorn3-4 sprigs rosemary5 sprigs thyme8 cloves crushed garlic First, I brought one gallon of water to a boil, then added in the salt and let it dissolve in the hot water. Turn the heat off and add in the peppercorn, rosemary, thyme, and crushed garlic. Let everything sit until it comes to room temperature to allow those flavors to infuse into the brine. Once it’s room temp, add in another gallon of cold water. Now, take your turkey and put it in a container (or turkey brine bag) big enough to cover it with the brine. (Make sure to remove and save your giblets first!) Pour brine and herbs into the container. If your turkey isn’t completely submerged, that’s fine - just flip it periodically so everything gets brined evenly. Let the turkey sit in the brine for about 16-24 hours, but no longer than 24 hours so it doesn’t get too salty! *Pro tip - I would usually use a small cooler to brine my turkey in. I would use about a half gallon less of water, and after the brine completely cooled I’d add in a couple quarts of ice. My turkey would go directly into the cooler and I’d pour the brine and ice over top. This helps keep the turkey cold and insulated so you don’t have to find room for it in your fridge! Just make sure to add some ice every now and then to keep it cold. After the brining time is done, drain off the brine but save the herbs - you can put them into the cavity of the turkey while it roasts for some aromatics! Then rinse the turkey, and let it sit for about a half hour to 45 minutes to dry off (because no one likes mushy turkey skin!). Next up, we’ll be releasing another blog post on roasting your Thanksgiving turkey! We want to hear from you! Do you like brining your turkey, or do you love it as it is? Let us know! Cheers to you and your health, ~Bethany Click HERE to browse turkeys for Farm Store pick up! Click HERE to browse turkeys for Neighborhood Delivery! Click HERE to browse our store!